user-avatar
Today is Friday
April 26, 2024

Tag: tech

September 20, 2016

Blackfire in 15 minutes helped me reduce my site load by almost 50%

by viggy — Categories: Tech, Triphippie — Tags: , , , , , , Leave a comment

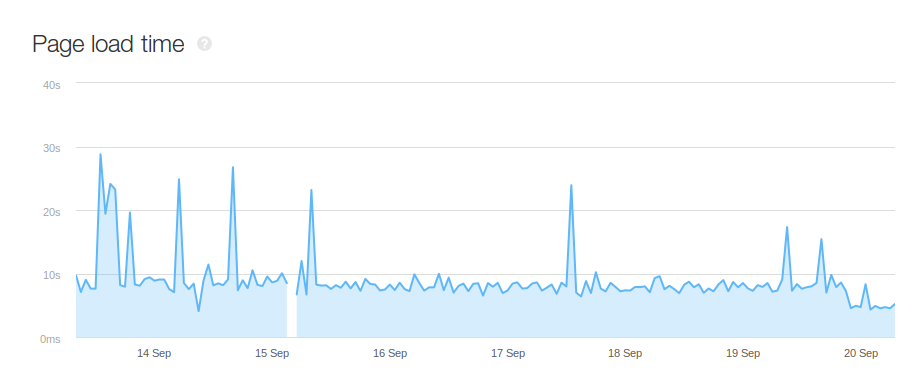
Having been working on Triphippie, an adventure travel marketplace for almost one year now, its pageload time was always one of our biggest issue. We have used Prestashop for Triphippie as it helped us to go live with a complete e-commerce site in less than a week. We did not concentrate on pageload time early on as we were more focussed on improving the product pages and overall features. Due to this negligence, the page load time was around 12-14s which is pathetic, especially for an e-commerce site. However in last 2 weeks, I was forced to work on improving its pageload time. First thing that we worked on was to migrate our images to Cloudfront. We did this successfully and reduced our page load time to around 8s-9s. This was still not good.

It was clear that our server was just taking too much of time to send the response, our first byte response was still around 6.5s. It was time to use a profiler and understand what was causing this. My initial guess was that this was an inherent issue of Prestashop as it depended heavily on data stored in database. To select a profiler, coming from a Java background, my clear intuition was that I needed something which will not force me to modify code unless I wanted some very specific things. I looked around and then came across Blackfire. The main thing I noticed in its documentation is that it can used without modifying the code at all. This suited me and I immediately signed in for the free premium plan for trail.

With the registration, it took just less than 10 mins to get the Agent and PHP Probe installed on the Amazon Linux EC2 instance. I used the Google Chrome Companion of Blackfire to run the profiler. In the first run itself, I noticed that one of the module of Prestashop which we had enabled on the homepage was executing a SQL statement which took 1.1s to execute. And there was another SQL statement which took 600ms to execute. Blackfire has very intuitive UI to analyze profile runs and this makes it very easy to pinpoint issues immediately. Apart from this, most of the other time consuming part were the Smarty Template compilation which was expected.

Pageload time from Pingdom

I just disabled the module which was causing the first SQL statement and to my surprise, my page load time decreases to 4.6s, it just reduced by almost 50% of the previous time. This was probably the most efficient 15 mins that I had ever spent on improving the site. Its really great that I can now just work on improving the site while being able to very easily get the profiler run output on my test machines and make improvement based on the results.

April 14, 2010

FOSS for budding developers workshop

by viggy — Categories: linux, tech — Tags: , , , , , 1 Comment

Last weekend, CMRIT GLUG along with IBM and FSMK conducted a 2 day workshop, “FOSS for Budding Developers”. This workshop was completely technical in nature and among the many FOSS workshops that I have attended, one of the most useful one for me. The professionalism of IBMers could be seen during the workshop which was also the main reason for the huge success of this workshop.

The workshop covered the following topics,
Day 1

  • Linux Kernel Developement
  • Eclipse IDE and how to develop plugins in it
  • Day 2

  • Linux Test Project
  • Apache web server and developing applications in it.
  • OpenPegasus
  • I was interested in Linux Kernel Developement and the Linux Test Project sessions. I had taken my laptop to make the best use of the workshop.

    I have been using GNU/Linux since last 2 years, but never did I get the courage to compile and build the Linux kernel. Only around 6 months back, I had for the first time with help of Naresh, installed the new linux kernel on my system using apt-get. The main reason for not trying out building my own linux kernel was that I was afraid that I would loose all the data I had in my system. However for the workshop I had decided that I will try it out. So when the Linux Kernel session started, I was very excited.
    In the pre-lunch session, we were introduced to various tools that any Hacker would require while trying to read the source code or build from source code. We were introduced to gcc, gdb, make, makefiles, strace,ltrace and cscope tools. Though I knew little about gcc and gdb, I realized the importance of the other tools. I particularly was marveled by “cscope” and “strace”. Optimized use of cscope will surely decrease the time taken to go through the source code for any developer. I remember it had taken me around 2 months just to go through the Evolution source code. If I had used cscope then, it would hardly take me 2-3 days for the same. We were given a very brief introduction to cscope during the session, but I will learn more about it myself and write about it in the near future.
    The pre-lunch session thus prepared the ground for us to venture in to building the linux kernel.

    Post-lunch we started with Building the Linux Kernel 2.6.33.2 version. I was amazed by the simplicity involved in building the kernel. It is just a 7 step procedure, if you are building the kernel for your own desktop or laptop.

    It took around half an hour to execute. After this I just need to update my grub if it has not been done by the above steps already. Just confirm it by having a look at /boot/grub/grub.cfg. If the new kernel lines are added then you are ready to Reboot and use the new kernel which was just built.
    Thats all.

    After booting into the new kernel, we started writing simple codes for new kernel modules and drivers. Again the simplicity of writing a new module or driver and loading it amazed me. However a lot more has to be explored and I will definitely try them in future.

    On day 2, I attended the Linux Testing Project workshop. It was again wonderfully planned by the IBM team. We were first given a brief introduction to the history and importance of the Linux Testing Project with the team making it very clear that the testing cycle is as important as the development cycle. After this we had a hands on session.

    In the hands on session, we started with building the Linux Testing Project in our systems. Than the IBM team had come with some tasks for us. We were asked to run a test case which was written such that it fails intentionally. This was done so that we could study the test case and come up with a solution as to why that particular test case was failing. I had teamed up with Saket and together we were very close to finding the solution. It was quite fun and really a good Hacker workshop.

    There were many interesting points that we noted while trying the Linux Testing Project. One among them was, I was using Linux Kernel 2.6.31.x where as Saket was using Linux Kernel 2.6.33.2. So when we executed the Containers Testcases on our systems we found that some test passed successfully in my system but failed in Saket’s system. This clearly showed us that Linux Kernel 2.6.33.2 had some bugs. We did not dig into the matter due to lack of time. However I need to check it soon.
    I have skipped lot of technical details here as I will give the technical details later when I try it again myself.

    April 13, 2010

    Use ALT-TAB for VNC machine on Linux

    by viggy — Categories: linux, tech — Tags: , , , Leave a comment

    This is for those who work usually on systems through VNC, I am one among them. It was very cumbersome for me to select tabs in the VNC system using mouse and not able to use ALT-TAB functionality. Hence when I searched in Google for any solution, I found a very simple soultion.

    Just change the ALT-TAB key binding in your linux machine to something comfortable for you. After you have done this, whenever you select ALT-TAB, the system passes that key-binding to the VNC window.

    The solution is just that simple. :). Enjoy.

    April 7, 2010

    How to enable Wireless on CentOS?

    by viggy — Categories: tech — Tags: , , , , 1 Comment

    Well since CentOS, in the name of stability never has any latest package installed, it is very difficult to do small things in it which is a matter of few clicks in some other distributions like Fedora or Ubuntu.

    However since I had CentOS installed on my laptop, I had to find a way to get my wireless up. So I started searching different ways to do it. First I had to get the system to detect my wireless. For this I followed the wiki given in CentOS, http://wiki.centos.org/HowTos/Laptops/Wireless#head-d0f09f4e13e1089355527862718bbf7548a5a64a

    After this I installed latest wireless-tools package which I downloaded from here, http://www.hpl.hp.com/personal/Jean_Tourrilhes/Linux/Tools.html

    Then I started my wireless using the following command,
    ifconfig wlan0 up

    After this I tried to find the available wireless connections which I could connect to. This can be obtained by the following command.
    iwlist scan

    After I found the wireless connection which I used to connect usually, I checked its features. However in CentOS did not give any option for me to enter the configuration in its wireless configuration.

    Hence after digging in internet for quite some time, I found out that I need to install wpa-supplicant package . So I downloaded the package and installed it as given in its install file.

    After that I needed to put the wireless configuration in the wpa-supplicant.conf file. Luckily I had saved the configuration details that I used in Ubuntu. This I used along with trial and error method to get the right configuration.

    You can get the explanation for each variable using “man wpa-supplicant.conf”. Following is the content of my wpa-supplicant.conf file.
    ctrl_interface=/var/run/wpa_supplicant
    ctrl_interface_group=wheel

    network={
    ssid=”ABCDEF”
    key_mgmt=WPA-EAP
    eap=PEAP
    identity=”abc@xyz.com”
    password=”password”
    phase2=”MSCHAPV2″
    }

    Once wpa-supplicant.conf is configured, start wpa-supplicant connection using the following command:
    wpa_supplicant -iwlan0 -c/etc/wpa_supplicant/wpa_supplicant.conf -d

    Voila. Now you have your wireless connection detected and working properly. Enjoy.

    March 24, 2010

    Custom icons to your script

    by viggy — Categories: tech — Tags: , , , Leave a comment

    I have to use VNC many times for my work. Everytime to invoke vncviewer, I had to press -F2 and then type “vncviewer”. I didnt want to do this and hence I thought I will write a simple shell script which I can use to run whenever I needed vncviewer. Hence I wrote following two lines in a shell script.

    #!/bin/bash
    vncviewer

    This I saved on my desktop and used to double click it whenever I needed to run it. However even this used to ask me if I wanted to run it or display it. Also the script had a default icon which I didnt want and wanted it to have the icon of vnc. Also I didnt like it to occupy my desktop area and wanted to keep it on my panel. Hence i searched on google for answers. i found the following mail which gave me a clear idea of how to do it.

    http://linux.derkeiler.com/Mailing-Lists/KDE/2009-04/msg00131.html

    You can create your own icons by creating a textfile and giving it a .desktop
    extension. That’s all an icon is. Go to /usr/share/applications and have a look.
    Anyone of those files can be dragged into you ~/Desktop folder if you use that for
    desktop icons or else directly onto your desktop.

    The format of the .desktop file is fairly simple to follow I have made them for
    url as well as script icons and keep them in /usr/local/share/applications. Once
    you have created the file the “icon” can be used like any other icon, e.g. adding
    to Quicklaunch. Use anything for an icon. Here is what one of mine looks like.

    [root@localhost ~]# cat /usr/local/share/vncviewer.desktop
    [Desktop Entry]
    Name=Vncviewer
    Comment = runs vncviewer script
    Exec=/usr/local/bin/vncviewer.sh
    Icon=/usr/share/icons/vncviewer.jpeg
    Terminal=0
    Type=Application
    Categories=Application;Internet;

    Hence now I could drag this icon on my panel and launch vncviewer in just one click.
    :)

    March 1, 2010

    Why I did not subscribe to Google Adsense?

    by viggy — Categories: tech — Tags: , , Leave a comment

    Around 4-5 months ago I had an idea of starting a portal dedicated only to all the errors faced by GNU/Linux users. I had thought that if there is one portal where every user can post and search for the error message that he got while using GNU/Linux, sooner or later these portal will become a good database of all the commonly found errors faced while using GNU/Linux. And then I had thought of using Adsense to generate money to maintain portal and if possible make some profit myself.

    However the main question that I asked to myself before using Adsense was “Can I restrict the Ads that are displayed through Adsense?” Because I didnt want the portal to end up promote any proprietary softwares through google adsense? I knew about Adbard then, but I did not believe using Adbard would help me earn as much as Adsense. Anyways I thought that google must have some way through which I can restrict some ads or allow only a category of ads. So when I asked this question in the Google Adsense help forum they told me that unfortunately they did not have any category for proprietary softwares. Anyways I figured out Adbard was the only solution for my problem.

    I remembered the situation after all these days when I opened a blog by a core developer of Ubuntu Server and I see MIcrosoft Online Services ad, sad isnt it?
    Why Open source enthusiasts should not use Google Adsense?

    January 13, 2010

    split and join huge files

    by viggy — Categories: linux, Misc, tech — Tags: , , , , , , Leave a comment

    I recently has asked my friend to download edubuntu9.10 iso . It was a 3.4 gb iso. After he finished downloading when i had to transfer it to my system, we faced a small problem. His LAN card was not working and we had only 1gb pen drive. So the only option we had was to split the iso into files of size 1gb and then transfer them using pen drive.

    command to split a huge file into smaller file.

    split -b 1G

    is the prefix of the smaller files that will be created.

    After I split the files, i transfered each file in to my system and then joined the files using a very simple “cat” command.

    Join the files splitted by the above commad.

    $cat aa bb cc dd>huge-filename

    The above command will join all the files and create the file huge-filename.

    I need to test whether the order of the smaller files matters in the cat command. Logic says that it should matter. lemme check it out.

    Confirmed it. The order of the smaller files is very importent to get back the original file.

    January 3, 2010

    real player sound problem solved

    by viggy — Categories: linux, tech, ubuntu — Tags: , , , , Leave a comment

    Thanks to this post, I was able to solve the real player sound problem in my machine.

    1. Enable Alsa soft-mixing as described in post http://ubuntuforums.org/showthread.p…multiple+sound
    (also setup esd and multimedia system settings as described in that post)

    2. Install realplayer as described in http://ubuntuguide.org/#realplayer

    3. Install alsa-oss

    4. Open the launcher script realplay located in Realplayer’s install directory (/opt/RealPlayer if you followed previous instructions)

    5. Find lines
    Code:

    if [ -n “$LD_PRELOAD” ]; then
    echo “Warning: LD_PRELOAD=”$LD_PRELOAD””
    fi

    6. …and after add this code:
    Code:

    LD_PRELOAD=”$LDPRELOAD:/usr/lib/libaoss.so”
    export LD_PRELOAD

    7. Now you get RealPlayer working with Alsa mixing (and so combinations of Realplay, Xine, Mplayer, Frozen Bubble,…sounds work at the same time )
    mriya3 is offline Reply With Quote

    December 11, 2009

    rm -rf *

    by viggy — Categories: debian, linux, tech — Tags: , , Leave a comment

    I just got an idea of trying out the command rm -rf * in a virtual system. I had thought of creating a new domU in xen server in the office and then testing in it. However I just tried to switch on my Desktop which had been shut since last week due to some problem with my HDD. Strangely when I started the desktop, the BIOS detected my HDD and it booted into ubuntu. Now this made my expiriment lot more easier because now all I had to do was take a backup of the VM image and then boot using the image in qemu.

    After booting up I started a screen and tried the command
    rm -rf /
    I got an error saying that “/” could not be deleted.

    Then I tried the command
    cd /; rm -rf *

    and then it started deleting all the files in my filesystem. I went to another screen and tried the command “ls”. It told me that “ls” command not found. Then I tried various commands, but none of them worked, except echo and cd. I dont know why these didnt get deleted.

    At last I was left with following file structure:
    notice:/# cd
    dev/ home/ lib/ proc/ .rnd sys/ var/

    When I just press Tab twice, I get the following output:

    notice:/#
    : } case continue elif export getopts kill popd select then ulimit
    ! alias cd declare else false hash l printf set time umask
    ./ bg cdcgi dirs enable fc help let pushd shift times unalias
    [ bind cdtmpl disown esac fg history ll pwd shopt trap unset
    [[ break command do eval fi if local read source true until
    ]] builtin compgen done exec for in logout readonly suspend type wait
    { caller complete echo exit function jobs ls return test typeset while

    Though this would be a very stupid thing to do in any circumstances, I didnt loose anything as I was just testing it on a VM. However the importent question still remains that is there any way to recover fmo here?

    December 9, 2009

    pushd and popd commands

    by viggy — Categories: linux, tech — Tags: , , , Leave a comment

    Suppose you are presently working some directory and for some reason you need to cd into some other directory for some trivial but urgent work. So how do you remember which directory you were in. This is where pushd and popd commands are used.
    Pushd command adds a directory to the top of the directory stack, or rotates the stack, making the new top of the stack the current working directory. With no arguments, exchanges the top two directories and returns 0, unless the directory stack is empty.
    sumit@sumit-Desktop:/var/www/cgi-bin$ pushd /usr/share/apps
    /usr/share/apps /var/www/cgi-bin
    sumit@sumit-Desktop:/usr/share/apps$

    and popd command removes entries from the directory stack. With no arguments, removes the top directory from the stack, and performs a cd to the new top directory.
    sumit@sumit-Desktop:/usr/share/apps$ popd
    /var/www/cgi-bin
    sumit@sumit-Desktop:/var/www/cgi-bin$

    I hope it is useful. Definitely very useful for me.